THCon21 - TUR-ROX-Z
Jun 14, 2021
6 mins read
Category: Reverse
Creator: Réchèr
Description:
A journey in Turing-approxi-complete video games, chapter “Z”.
“ZZT” ? What is that strange file extension ? It may be something old. If it’s old, there is a MUSEUM about it. Whatever it is, I suppose it has nothing to do with the Riemann ZETA function.
Attachments:
First step: discovery
I had indeed never seen the file extension ZZT before, so I did some research using the hints in the challenge description: “zzt museum zeta”, which led me to a ZZT player called Zeta, along with a detailed tutorial on how to run and even edit ZZT files.
So I launched the ZZT world and started searching around for something interesting.
The first thing we get to see is the flag format, with the first letter of the flag, which is sweet but not enough. Going to the south-west, we see a flowchart explaining how to solve the challenge (but we already went through most of these steps). And at the north of the world, there is the main puzzle room, which will be our main interest for the rest of this write-up.
Next step: understanding the puzzle
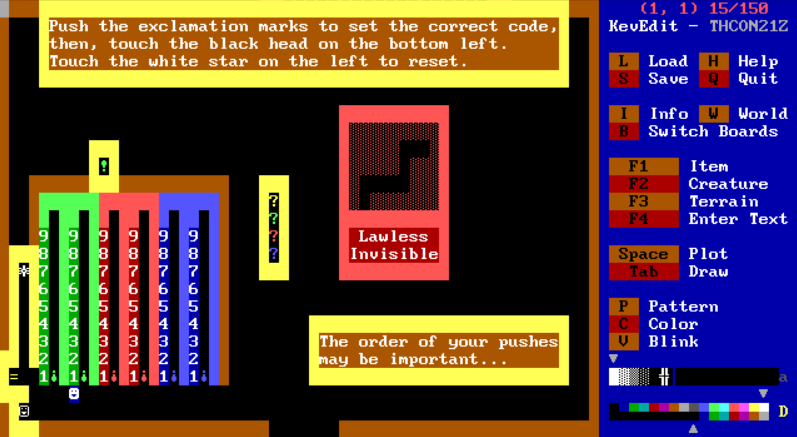
We can open the ZZT world using KevEdit and switch to the third board:
ZZT allows the map maker to script the behavior of the map using custom Objects and a scripting language similar to Basic. This language is documented here
In this map there are 14 scriptable objects of interest:
- The black face
☺at the bottom left which checks if you solved the puzzle - The white star
*on the left which resets the level - The green exclamation mark
!which is the core of the green puzzle (also called “part A”) - The upside down exclamation marks
¡which are sliders for the green, red and blue puzzles - The lawless invisible object at the beginning of the red path, which is the core of the red puzzle (“part B”)
- And finally, the question marks
?which are unattainable and are here for debugging purposes
The first thing I did, for more comfort in solving this challenge, was to paint the walls of the invisible path in white so I could see it in game, change the character of the lawless invisible object to an A (instead of space), and remove the walls blocking the debugging objects.

Now I’m going to explain each of the puzzles ordered by difficulty (because in my opinion, part A was the most difficult to understand).
Part B - The red puzzle
By pressing [Enter] on a red ¡, you get a menu and where you can edit the script of the object.
Here is the script for the leftmost one:

And the rightmost one:
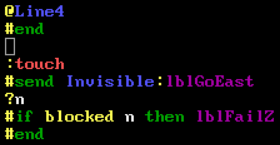
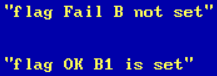
The #send command jumps to a label. So #send Invisible:lblGoUp jumps to the label :lblGoUp in the script of @Invisible. I think you’re smart enough to understand what these labels do. So my intuition was that you need to push the no-longer-invisible guy to the end of its path. That’s one time left, four times right, two times left, two times right. The resulting code for the red puzzle is 47. We can check the puzzle is solved by going to the red question mark:
Note: the line #if blocked n then lblFailZ just checks if you pushed the slider to the end of the track.
Part C - The blue puzzle
Here are the scripts for the left and right blue ¡:
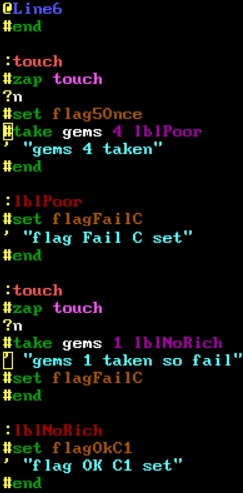
Note: the lines starting with ' are comments, so the messages on these lines aren’t displayed by default.
So this one is a bit more complicated. The left slider gives us one gem everytime we push it.
Something we can see as well is the flag5Once flag. It will make you fail if you push the left slider after pushing the right one. So once you’ve pushed the right one, you can’t give yourself more gems.
As for the right one, we have to look at the #zap command. According to the documentation, this command disables the first occurence of a chosen label. In this case, this implies that the first time you push the right slider, it will try to take 4 gems from you. Then the next time, it will only try to take one gem at a time.
Now let’s look at the documentation for the #take command. It tries to take a certain amount of gems from the player, and jumps to the specified label if it fails (ie. if the player doesn’t have enough gems). So here, we need to succeed in taking 4 gems to avoid :lblPoor which makes us fail. Then we need to fail taking one more gem to jump to :lblNotRich and set flagOkC1.
In the end, we need to push the left slider 4 times, then the right slider 1 time (if we push it more, it goes to a third :touch which makes us fail as well), which gives us the code 53 for the blue puzzle.
Part A - The green puzzle
Here are the scripts for the left and right green ¡:
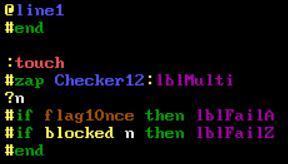
Again, there is a flag to make sure that you don’t push the right slider after the left one.
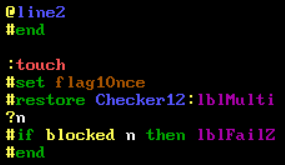
Looking at the documentation for the #restore, it re-enables a label disabled by the #zap command.
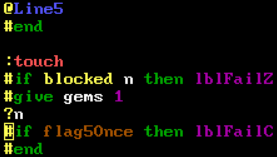
It doesn’t look like much, so we have to dig in the final verification to understand what this does. Here is the beginning of the verification script:
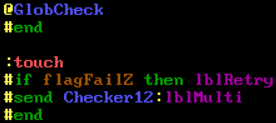
As you can see, it will jump to :lblMulti in the entity @Checker12 (which is the green ! at the top). Here is its script:
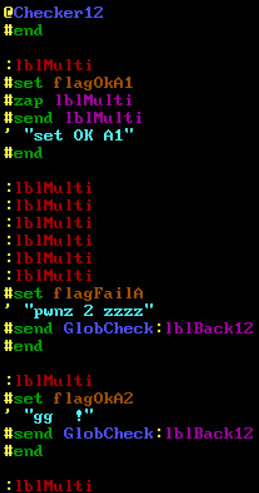
So by default, the global checker will jump to the first :lblMulti which sets flagOkA1 (yay!) and then jumps itself to the second one which sets flagFailA (nooooo 😢).
If we use the first slider seven times, we will zap enough :lblMulti to make the global checker jump where it sets flagOkA2. But then we won’t have the flagOkA1 set anymore.
Fortunately, the #restore commands restores the first label that you’ve zapped (not the most recent one). So if we push the second slider one time, it will restore the label that sets flagOkA1, then jump all the way to the seventh :lblMulti (because all the other ones are still zapped) and set flagOkA2. This gives us the code 82 for the green puzzle.
The End
Now going to the global checker, we get to hear a nice victory music along with this message:

So the flag is THCon21{Z
This was a very mind-bending challenge but it was nice when we were finally able to understand all the little scripts and figure out the answer. Special thanks to the author who visibly put a lot of effort in creating this challenge.
Now if you want to see more about scripted puzzles, you can continue to this challenge’s brother: TUR-ROX-Y.
Or you can go back to write-ups list.
Sharing is caring!